Episode 4: Hubble Bubble! - Space Telescopes
- Abigail James

- Feb 24, 2020
- 15 min read
This blog post is a transcript of Series 1, Episode 4 of my science podcast, Don't touch my Radium! All sources, references and recommended material can be found here.
We’ve reached a point where we’re going to start getting a bit more detailed on some topics we’ve looked at before so let’s have a quick rundown of where we’re at.
Life exists on our planet because of a few factors: our solid rocky surface, our distance from the sun, the presence of liquid water, the addition of oxygen to our atmosphere, the existence of our atmosphere, and the protection from the magnetic field. Now, if we want to look beyond our own planet we need telescopes that can do this, magnifying objects isn’t enough so we need to be able to collect the electromagnetic radiation that is emitted in a way that we can understand. We can learn about the composition of an interstellar object by gathering it’s light and converting it to electrical signals that can be read by spectrographs, the light can also be converted into a direct image showing a photograph of the object. But these images are distorted when they pass through the aberrations in our atmosphere, one way that we can get a crisper view is if we move our telescope to outside of the atmosphere. We can do this by placing it in orbit around our planet but it’s going to cost a lot of money! We’ll need a rocket to get it up there and satellite equipment and technology to keep it operational in the extreme conditions of space. It will require years of research, hundreds, if not thousands, of people working in many areas of science, engineering and technology to all come together to make this happen. But what we will be able to get back, the things that we will learn about our universe will make it all worth the effort!
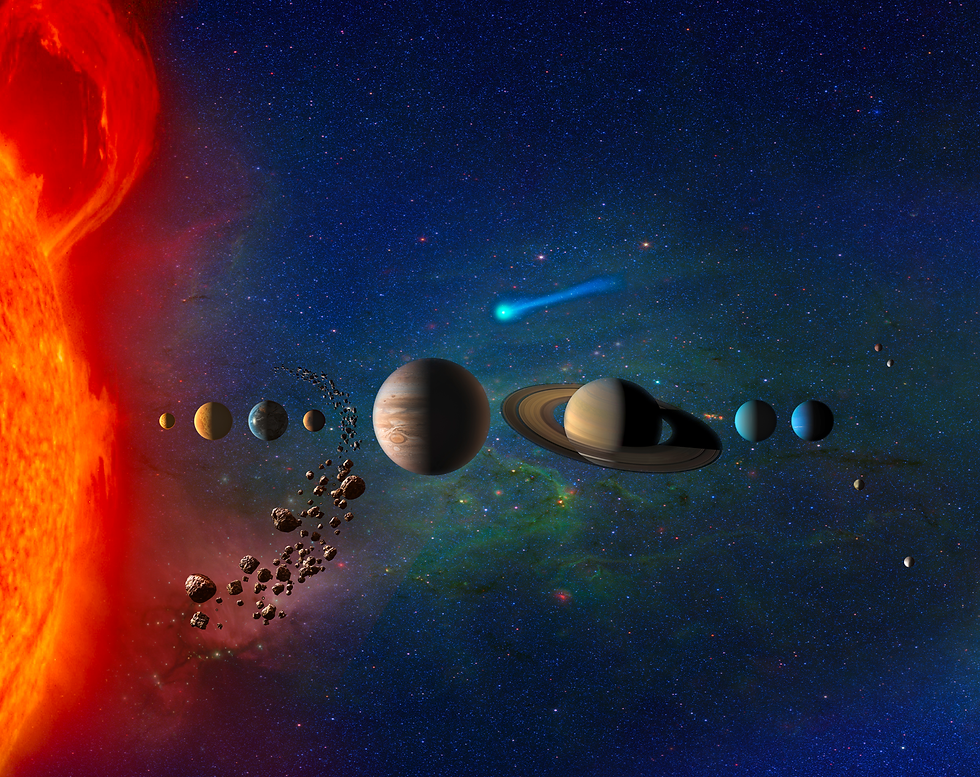
Modern satellites have a range of sizes and uses; they can carry cameras and scientific instruments and they can be pointed towards the Earth to measure gases in the atmosphere, track how much energy the planet absorbs and emits, read the spectral signatures of our planet. Some of the most important satellites are tracking weather patterns to keep us updated on wildfires, volcanoes and climate changes. But more excitingly for our story, they can also be turned towards the stars to collect information about our universe, showing us the existence of other solar systems, evidence of exoplanets and detecting signatures from worlds light-years away bringing us closer to finding out if there could be other life out there.
Space Telescopes
The first satellite picture of our planet was taken by NASAs explorer 6 in 1959. It was a small satellite about 65kg, designed to study trapped radiation, cosmic rays and geomagnetism among other tasks but it also tested a TV Optical Scanner; a system containing a concave spherical mirror and phototransistor along with a video amplifier, timing and logic circuits and telemetry, all combined into a unit that could obtain low-resolution daylight photographs of Earth’s cloudcover. This device is the precursor to TV camera systems used on more advanced satellites. Over the years, as we learn more about satellite technology and how to gather light to produce imagery, the potential to place telescopes in space became more promising. We learned last week about the need for a propulsion system, thermal protection, structure requirements as well as computer, control and communication systems. What do we need to add to turn our satellite into an observatory? What you need exactly is going to depend on your telescope's purpose.
Everything in the universe that is warm gives off light, and where the light falls in the electromagnetic spectrum depends on the temperature. Cooler objects glow faintly at longer wavelengths and hotter objects glow brightly at shorter wavelengths. Our sun temp is 5778K, glows brightest in the visible region. People are at a temp of about 310K and glow at infrared light. We learned in a previous episode that planets absorb the radiation from their sun and then emit heat in the infrared region. When looking for exoplanets and biosignatures in their composition we focus mostly on the visible and infrared regions of the electromagnetic spectrum. Telescopes that focus on the visible are commonly referred to as ‘optical’ telescopes and infrared being Infrared telescopes. They can be purpose built in each case, or they can also be combined into one satellite system depending on the equipment you include. Later on and in future episodes we’ll look at specific telescopes such as Hubble, Kepler and the upcoming James Webb in a more detailed way that will highlight the advancements in technology over time. For now, there are a few items that we’ll cover a bit more generally: Mirrors, detectors, and an object that we haven’t mentioned up to now, a coronagraph.
Mirrors
Firstly, we’re going to need reflecting ‘mirrors’ to gather and focus the light. We mentioned in Episode two that refractive telescopes are subject to aberrations and distortions that blur the images we can see. Adaptive optics can be used to reduce this effect but the invention of the reflecting telescope led to mirrors being used to observe distant objects such that all professional telescopes now use mirrors. Reflecting mirrors also increased the size of telescopes on the ground, and as the amount of detail a telescope can see is directly related to the size of the mirror, or the light collecting area, the bigger the better! However, when it comes to space telescopes, the problems we discussed last week with rocket launches and costs come back into play, reducing the mirror size we can have in space. What’s important for the telescope is radial symmetry, so keeping a roughly circular shape is good. But you can make a telescope out of another shape, there’s no rule I can find against this, however it might need a larger truss or support beams, maybe a larger dome, all making the telescope more expensive. Since the light collecting area is the most important factor it just makes sense to have them circular as the shape is more compact. So how do we get a large roughly circular mirror into space? Well one way to work around this is to use a segmented mirror, a lightweight structure that combines smaller reflected segments. Each segment acts as a separate telescope sharing the focus. As we don’t want any gapping, a hexagonal shape for each segment is a good call, they can be folded up for launch and then aligned using computer controlled active optics and actuators (little motors) once in orbit. The Hubble space telescope has a mirror of 2.4m, using segmented mirrors, James Webb will have a primary mirror of 6.5m. Mirrors, including Hubble’s, are traditionally glass with a reflective coating. This is why studies into reflective and lightweight materials is so important to increasing the size of telescopes in space.
The secondary mirror then, can be much smaller and is used to focus the reflected light towards a detector that can interpret and convert the light signals.
Detectors
The first photodetectors, that we know of, were our eyes. Wavelengths of visible light activate the receptors allowing us to see the world around us. But the longer wavelengths of infrared light carry less energy and so they don’t activate the photoreceptors in our eyes and we cannot ‘see’ them. So we need to create detectors to help us to interpret the light from the visible region but also ones that can detect infrared light (near and mid only, remember planets don’t emit in the far ir region!). We’ve talked about detectors a little bit previously when we learned that early telescopes used photographic plates to record spectra. Current detectors are applications of solid state physics and are semiconductor based devices such as infrared arrays, complementary metal-oxide-semiconductor (referred to as CMOS) and the charge-coupled devices (ccds) that we talked about in episode 2.
Some of characteristics of detectors that are considered in their design are related to: sensitivity, size, number of pixels, stability and their cost. The region that you want to look at will determine the type of material used for your sensor.
Optical telescopes will normally use charge-coupled devices while Infrared telescopes will use an IR material with a silicon CMOS.
There are a few stages in photon detection for an Optical/IR detector:
Note: try to remember the photoelectric effect from episode 2 here, light hits a material giving the electrons energy allowing them to escape and the amount of energy that is transferred depends on the wavelength of the light.
Collect light: the detector must have anti-reflection coatings so that it can collect all the light that the secondary mirror is focusing towards it.
Generate a charge: a semiconductor material is used for this. Semiconductors are sensitive to light or heat and can be used to convert energy, in our case convert the light into electrical charge. Materials used can be: Amorphous silicon (Si), Mercury cadmium telluride (HgCdTe) or Indium antimonide (InSb).
Collect the charges: the generated electrons are collected into pixels by electrical fields in the material.
Transfer the charges: for visible light, the ccds move the photo-electrons towards an amplifier normally located at the edge of the detector. This stage is not needed for IR light.
Convert to a Digital Signal: the detector then amplifies the charge and converts it to a digital signal that can be relayed back to Earth’s surface where the signals can be analysed. A pattern of collected electrons will form an image when they are read out.
Let’s talk about coronagraphs! Totally new topic and concept to me so bear with me.
Coronagraph
Stars are bright! They are hot hot objects that radiate huge amounts of light, blocking our ability to find the light of other objects nearby. The coronagraph was invented back in the 1930s as a way to block the light coming from the photosphere (the large visible surface of the sun) leaving only the light of the corona, the thin hot outermost layer of the sun. The best way to visualise this is to think of a solar eclipse, a coronagraph is creating an artificial solar eclipse as viewed by the telescope. What this does is it reduces the amount of starlight overwhelming the telescopes detectors and allows for starlight and planet light to be separated and objects close to the sun can be seen.
There’s a great video on Space.com that explains how this is done.
Basically, a mask is used to block the central light, redirecting remaining light to the outer edges. The light from both the star and planet enter the telescope at different angles so the planet’s light misses the mask and passes through. As is the theme with telescopes, the more light you collect the better your image will be, but in this case, that means also collecting more starlight which overwhelms the light from the planet. Using a deformable mirror, distortions in the light can be corrected and you can remove the star's light, clearing up the blurry images of planets so that they come through like dots. You can then pass the light through a prism to get your spectral graph and analyse the absorption lines to learn about the molecules in the atmosphere of the planet that is absorbing the light from the star.
Last week we mentioned that the Orbiting Astronomical Observatory was the first orbiting telescope launched in 1968. But the first one that we are interested in didn’t come along until 22 years later! It was finally time to look out at our neighbourhood and beyond with a powerful space observatory and start the search for extraterrestrial life signs.
Hubble
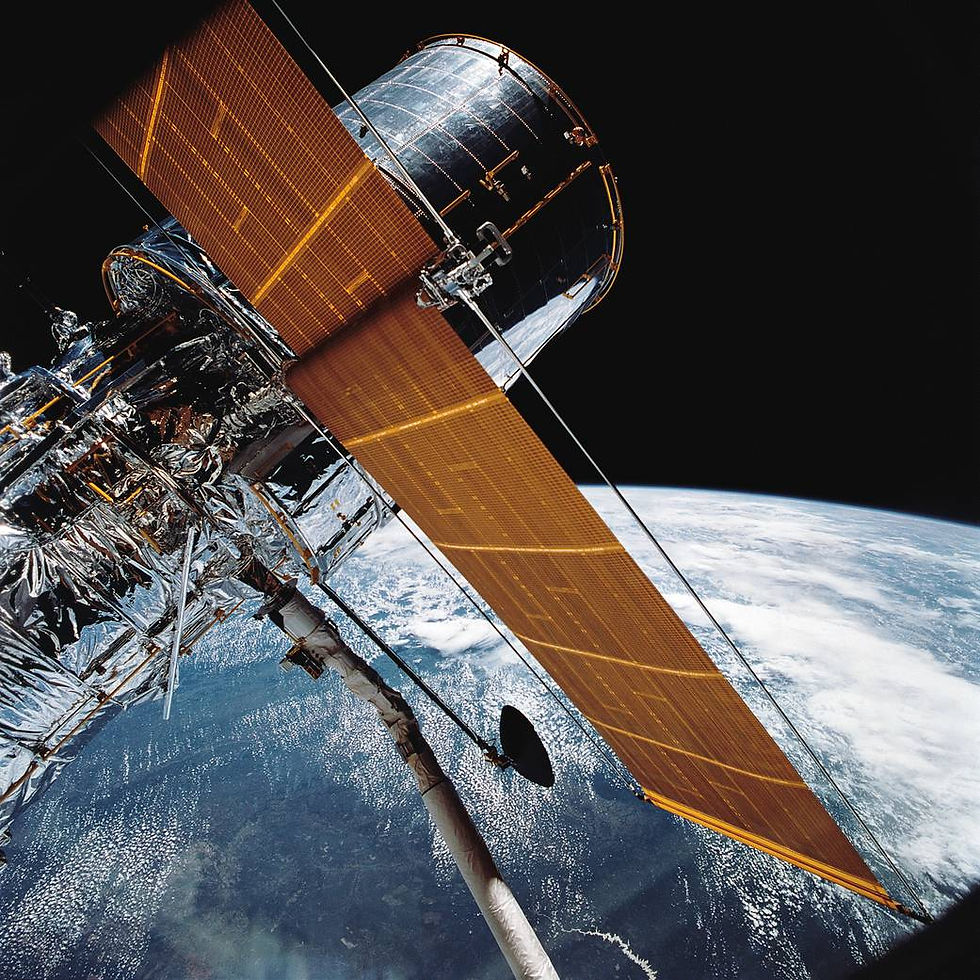
Hubble was launched in 1990, designed to monitor space from low Earth orbit sitting at about 540 km from the surface of the planet, travelling at 27,300 kph and orbitng our globe in 95 minutes. Although Hubble wasn’t directly designed to hunt for biosignatures and alien life, it was designed to operate in the visible, near-IR and UV bands of the em spectrum and so can collect information that we’re interested in.
Most of the information in this section is taken from the Hubble website, which has a huge amount of information as well as an awesome gallery that’s totally worth checking out.
Let’s start with the general structure as a continuation of what we discussed last week about the structure of a satellite.
General Structure
Solar arrays : Hubble is powered mostly by sunlight, with backup batteries, through two 25ft solar panels that cover the ‘wings’ of the structure. They use gallium-arsenide photovoltaic cells that can produce enough power for all the instruments to operate simultaneously. Note: these are not the original sets! They were updated on one of the service missions back in 2002.
Thermal protections: It has a blanket of multilayered insulation to protect the instruments and structure from extreme temperatures.
Computer/Automation: there are two main computers - one to talk to the instruments, send commands and information and to transmit data, a second to act as a control system both for pointing as well as system wide functions. (There are a number of other computers and microprocessors as well.)
Communication Antennae: there are four antennae that allow technicians to communicate with the telescope from the ground so that it can receive detailed instructions on what to do and when to do it. When Hubble needs to send data back to the ground, digital images and spectra are first stored in solid-state recorders which are then converted to radio waves, these waves can be beamed through one of the antennas to a NASA communication satellite which will then relay the information to the ground.
Pointing system: there are gyroscopes, reaction wheels and fine guidance sensors that allow Hubble to orient itself.
A lot of this is similar to the satellites we discussed last week, so what are the parts of Hubble that make it an astronomical satellite?
Hubble is classed as a Cassegrain telescope, apparently attributed to a catholic priest in 1672 named Laurent Cassegrain! It is a reflector telescope that consists of a 2.4 m concave primary mirror weighing 828kg and a secondary 0.3m convex mirror. Work began on constructing Hubble’s mirrors in 1979, with the polishing being completed in 1981, 9 years before it was launched. Hubble uses ultra-low expansion glass, fused quartz, for its mirrors, which is then coated with pure aluminium and a layer of magnesium fluoride which acts as a protective layer but also increases the reflectiveness to UV light. The temperature control systems keep Hubble's mirrors at room temperature to avoid any warping. The primary mirror collects light and reflects it onto the secondary mirror which, once again, reflects the light back but this time it travels through a central hole in the primary mirror directing it to a focus and forming an image at the focal plane. ‘Pick-off’ mirrors then send the light to the various instruments used in the processing.
Since Hubble’s launch in 1990, there have been 5 servicing missions where astronauts have both installed new equipment and made repairs to the existing instruments. Different generations of cameras and spectrographs have allowed Hubble to continue to observe the cosmos 30 years after it’s launch and improve the quality of the data it sends back to Earth. Let’s have a look over the current instruments onboard.
Starting with cameras! Cameras are what house the detectors used to interpret the light signals and survey the area to make images out of the information. Hubble has two primary cameras.
Hubble's instruments
Advanced Camera for Surveys
The ACS was installed in 2002 during the service mission 3b and was designed to survey the sky with wide-field imagery in visible wavelengths, but can also detect UV and NIR, contributing to the deep field image showing a compilation of all the galaxies in one region of space. ACS was designed with three channels, High Resolution Channel (HRC), Solar-Blind Channel (SBC) and Wide Field Channel (WFC). WFC and HRC both use ccds as their detector devices while SBC uses a multi-anode microchannel array. They all use filters that rotate blocking specific wavelengths of visible light and allowing only the colour you want at that time to be transmitted to the detector for an image. Unfortunately in 2007, both the WFC and HRC became inoperable due to an electronic failure, thankfully during service mission 4 where the WFC3 was installed, the WFC on ACS was able to be repaired.
Wide field camera 3
Of all the instruments in the observatory, WFC 3 is the most used one. It was installed by astronauts in the 4th service mission back in 2009 and can interpret light in the UV, visible and Near-IR ranges of the electromagnetic spectrum. It can do this because it has two channels, a UV-visible one and a Near IR one, each with it’s own detector; a ccd for the UV-vis and a HgCdTe one for the NIR. WFC3 has a ‘Field of view’ of 160 x160 arcseconds, this is pretty much what it sounds like, it’s how much of the sky you can see. The NIR channel doesn’t interact with radiation with a longer wavelength than 1700nm, so it’s kept cool using a thermo-electric cooler. Remember we said that objects emit heat and that satellites have to control their temperature, this is especially important when you're using a detector that is designed to read these heat signatures, there can’t be any interference that would cause the readings to be compromised.
We’re onto the spectrographs! A spectrograph can be used to learn about the temperature, density, chemical composition, even the velocity of any object that absorbs or emits light. They also use detectors to collect and interpret the light but a spectrograph doesn’t produce an image. Hubble uses two spectrographs.
Cosmic Origins Spectrograph (COS)
This spectrograph was also installed during the fourth service mission in 2009, expanding Hubble’s ability to investigate objects emitting in the UV region. COS is designed to study large-scale structures by looking at how galaxies, stars and planets are formed and how they have evolved over time. Through doing this, it can provide us with information on how the elements needed for life, like carbon and iron, would have first formed.
Space Telescope Imaging Spectrograph (STIS)
STIS was installed way back in 1997 during the second service mission, unfortunately a power supply failure caused it to stop working in 2004 and astronomers had to wait until service mission 4 in 2009 for it to be repaired. STIS combines a camera with a spectrograph to gather information about the chemical content, temperature and motion of not only planets and stars but looking at interstellar gas and galaxies as well. STIS has three detectors, one ccd for the visible and NIR light and two multi-anode microchannel arrays for the UV light. STIS uses mirror gratings to separate the light and look for absorption and emission lines in each wavelength to find out about chemical composition meaning that not only can it report on changes in the universe but it can analyse atmospheres of worlds around other stars
Lastly are the interferometers!
Fine Guidance Sensors (FGS)
The FGSs on Hubble are three interferometers that are used to measure the relative positions and brightness of stars. These are the instruments that keep the telescope pointing at an object so that it can collect enough information. They are the only instrument to not use pixel-based detectors, instead they use photomultiplier tubes to track the light from stars. Two of the sensors lock onto ‘guide’ stars and then measure the position of the telescope relative to the object it’s interested in studying. The sensors are at 90 degree intervals around the circumference, each one has a pair of prisms that can detect small angular changes in a guide star's position which it then communicates to the pointing control system that can make corrections to keep the target in its field of view.
That’s a whole lot of information about what Hubble uses to explore the universe, but what has that all achieved in the last 30 years? Well, a LOT! Hubble’s history and discovery timeline is available on hubblesite.org, and if you look through it, you’ll see so many incredible achievements. For us here, let’s run through some of the most important moments related to the search for life in our universe.
Telescopes are time machines. Light travels through the vacuum of space until it interacts with matter in its path. When we look at this light we are looking back in time. Even the light that reaches us from our sun is 8 minutes old! What about the next closest star to us, Proxima Centauri, it takes 4.3 years for the light to reach us, so we are looking at its past in our present. In January of 1996 Hubble showed us all what the universe really looks like. The telescope looked at the same tiny patch of sky for 10 days and collected as much light as it could, when a picture was formed from this light it formed the Deep Field, a composite picture showing galaxies, 3,000 of them, some of this light has been travelling for 10 billion years, we are looking back in time at our early universe.
Hubble wasn’t purpose built to search for exoplanets, but in 1996 an unexpected warp in the images of a disk of dust encircling a star was detected, and identified as an exoplanet.
In 2001, Hubble was able to take a direct measurement of an exoplanets atmosphere! It detected sodium in the atmosphere of a planet referred to as a ‘hot-Jupiter’ that orbits a star 150 light-years from Earth.
In 2002 astronomers were able to make a precise measurement of the mass of an exoplanet, this was Gliese 876b and its 1.89 to 2.4 times as massive as Jupiter.
In 2008 Hubble made the first detection ever of an organic molecule, it found methane in the atmosphere of a Jupiter-sized planet orbiting another star. And that same year, the telescope directly observed an exoplanet, taking the first visible-light snapshot of Fomalhaut b, orbiting its star. Fomalhaut b is a tiny point source of light in this image. Keeping on a roll in 2008, that December, Hubble found carbon dioxide in the atmosphere of a planet orbiting a star taking a hugely important step in the trail of discovering biosignatures of extraterrestrial life as we know it.
In 2017 Hubble studied the atmospheres of planets in the TRAPPIST-1 system, which contains seven planets that are all about the same size as Earth with three of them being in the habitable zone.
In September of last year, 2019, while looking at the planet K2-18b which orbits in its habitable zone, 124 light years away, Hubble found water vapour.
The accomplishments of Hubble over the last 30 years are remarkable and invaluable. As Hubble travels in orbit around our planet, looking out into the universe, providing us with information and beautiful images, we once again reach a point of limitation. Each time we advance our technology, we approach a moment where we have gathered all the new information we can in this way and begin looking for new methods in order to explore further or deeper, to get more information, to find better information. Now that we know there are planets orbiting stars in other solar systems in our galaxy, and that there are billions of galaxies in our universe, it’s time to find a way to expand our knowledge. How do we know what types of planets are out there? What could we possibly expect? What exactly are we looking for?
Articles
What Is a Coronagraph?, Adam Mann, 2019, Space.com
The World’s First Space Telescope, James Lattis, 2018, Scientific American
Hubble Space Telescope: Pictures, Facts & History, Nola Taylor Redd, 2017, Space.com
Education Sites
Observatory Instruments, Hubble Space Telescope, NASA
Telescopes and Detectors, George Djorgovski, California Institute of Technology
CCDs, Spacebook, Las Cumbres Observatory
Cool Cosmos, Infrared Processing and Analysis Centre, California Institute of Technology
Research
TV Optical Scanner, Dr Kay D Baker, NASA
How a telescope mirror is ground, polished and figured, George S Jones, 1890, Sidereal Messenger, vol.9, pp 353-363

If you are an amateur in astronomy or it is your first time using a telescope for a solar eclipse, understanding telescopes are compulsory and it can be overwhelming. That is why we are going to highlight features to help you select a perfect telescope for you.